- Visit http://192.168.0.1/ to arrive at the login screen
- By default, enter cusadmin for the username and password for the password
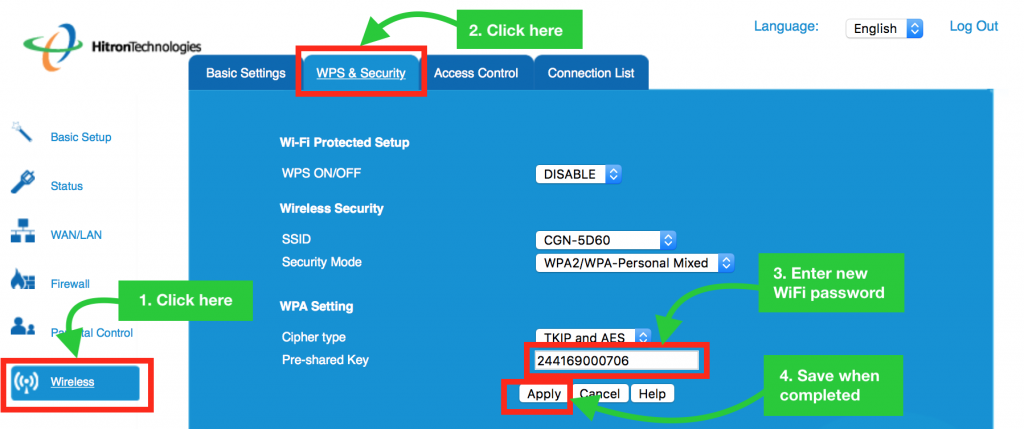
- On the left, click Wireless
- On the top, click WPS & Security
- Under the WPA Settings, modify the Pre-Shared Key to your new password
- Click Apply when complete to save your changes. Note: changing the password may cause your device(s) to disconnect, and you’ll need to reconnect with the new password
- Open a browser and visit http://192.168.0.1/
- When prompted, enter cusadmin for the user and password for the password
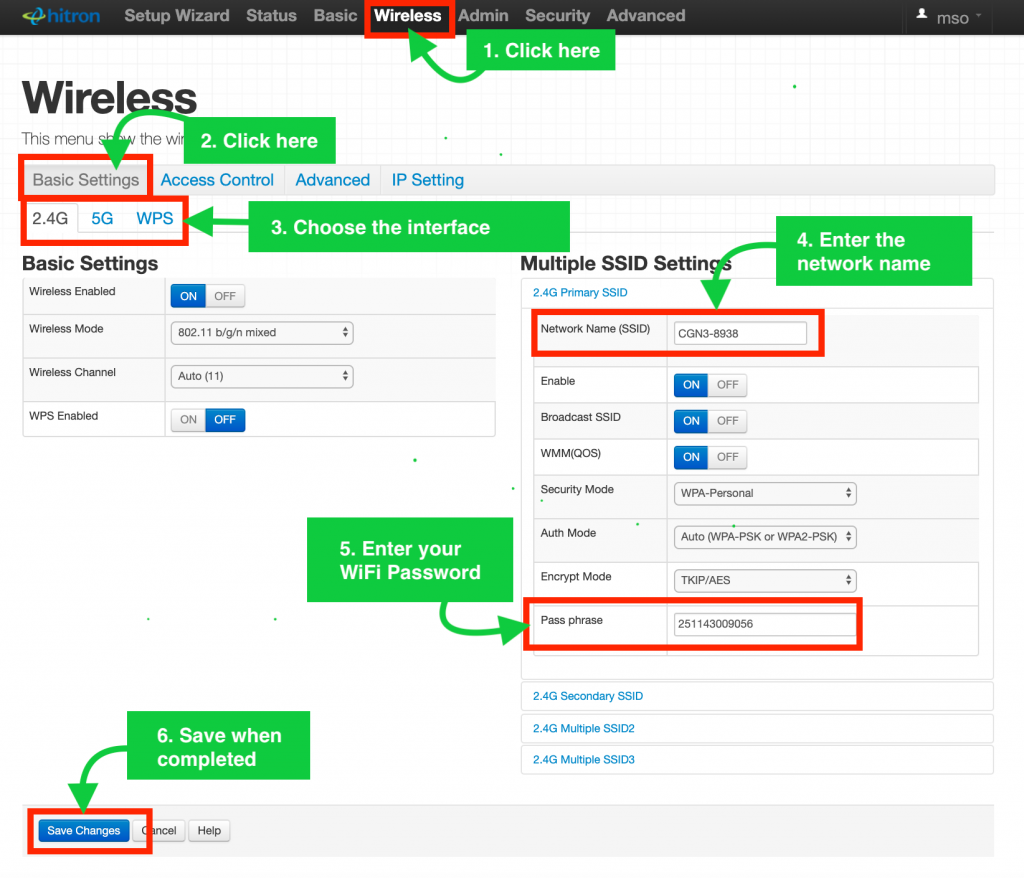
- From the top menu, click Wireless
- From the submenu, click Basic Settings
- Click 5 GHz or 2.4 GHz depending which network you are using
- Click Basics
- Change the Network Name (SSID) and/or the Pass phrase.
- When completed, click Save Changes at the bottom
- Click Apply/Save at the bottom
- Open a browser and visit 192.168.0.1
- For the username, enter cusadmin and for password enter password.
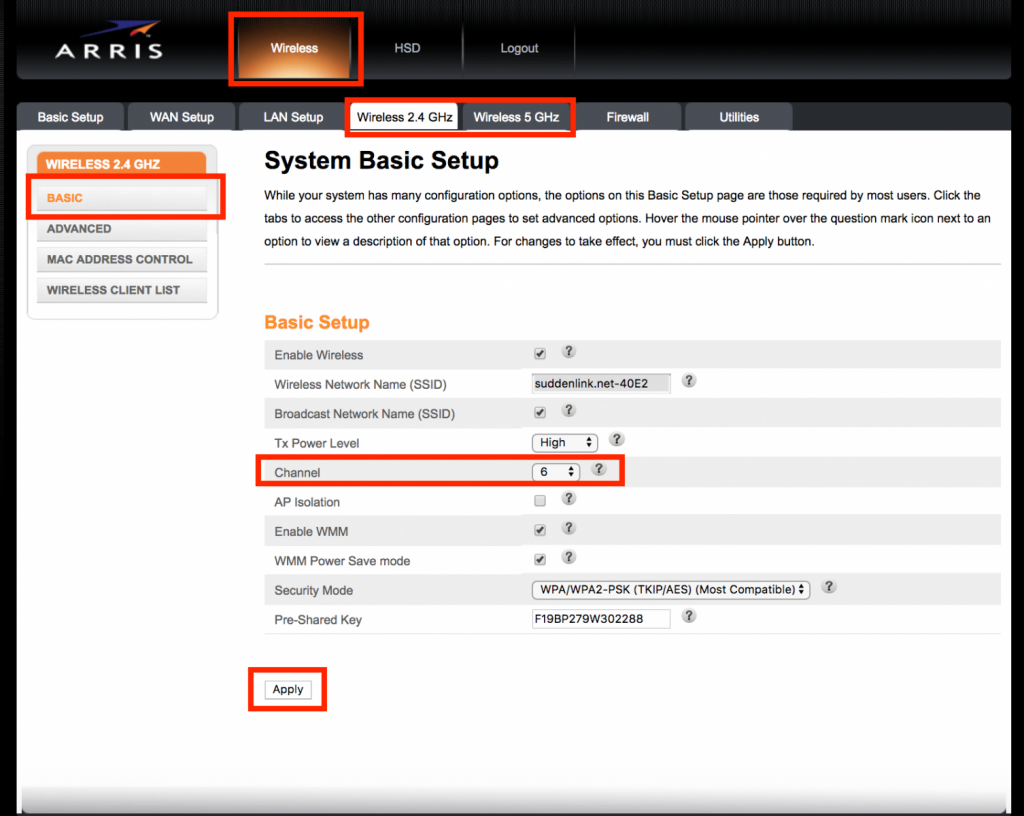
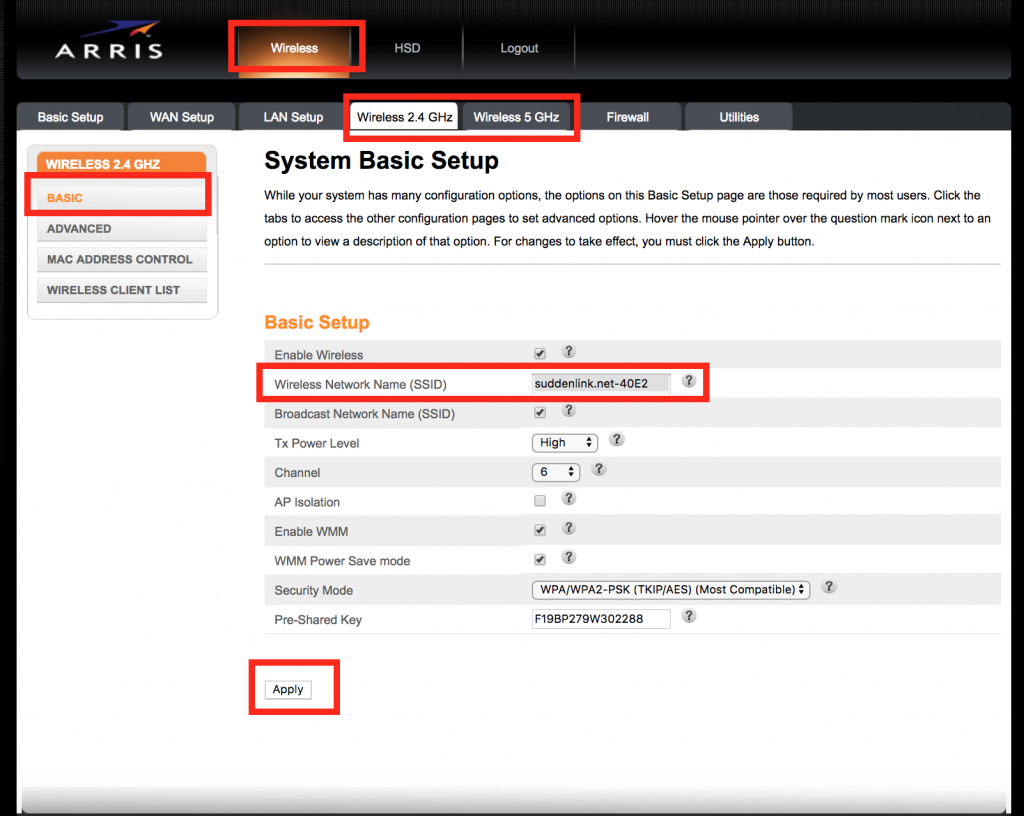
- On the top menu, choose Wireless
- From the sub-menu, choose Wireless 2.4 Ghz (or Wireless 5 Ghz depending on what interface you are modifying).
- To change the WiFi name, edit the Wireless Network Name (SSID) field.

- Open a browser and visit http://192.168.0.1/
- From the Status menu (the only menu available) choose DOCSIS WAN
- Leave the Username and Password empty and click Log In.
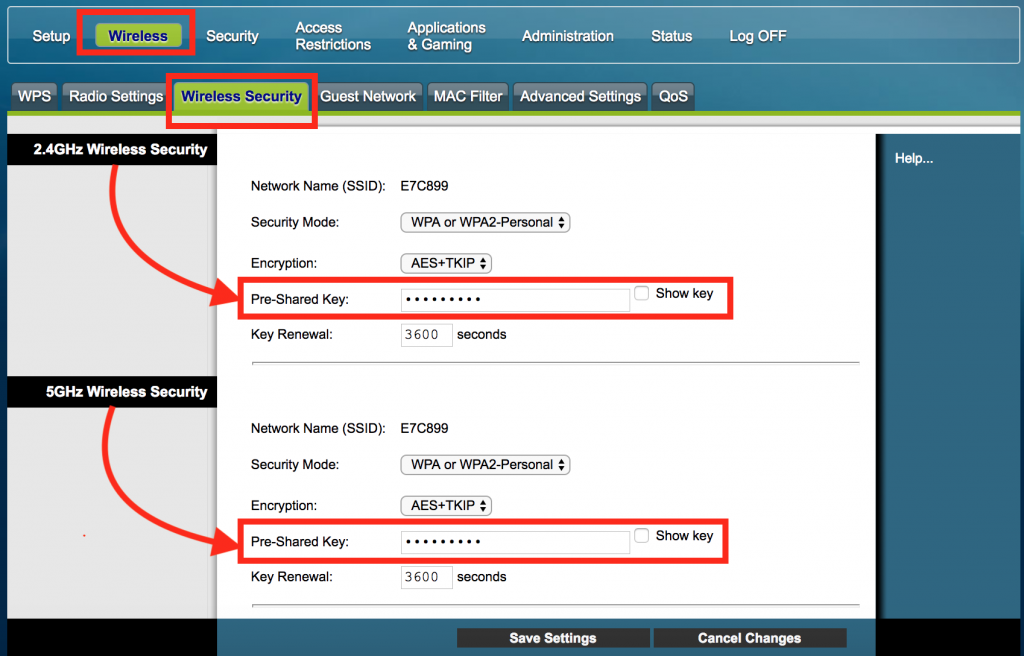
- From the Wireless menu, click Wireless Security
- Edit the Pre-Shared Key to a key of your choice, and click Save Settings
- Open a browser and visit http://192.168.1.1/
- When prompted, enter admin for the user and kh3mfMAK for the password
- In the left menu click Wireless
- Underneath Wireless, choose the appropriate band you are connected to (either 5 GHz Band or 2.4 GHz Band)
- Underneath the Band menu, choose Basic.
- Underneath Wireless, click Security
- To view the current password, click the link Click here to Display beside the WPA Passphrase field
- To change the password, simply edit the WPA Password field to a password of your choice and click Apply/Save
- Open a browser and visit 192.168.0.1
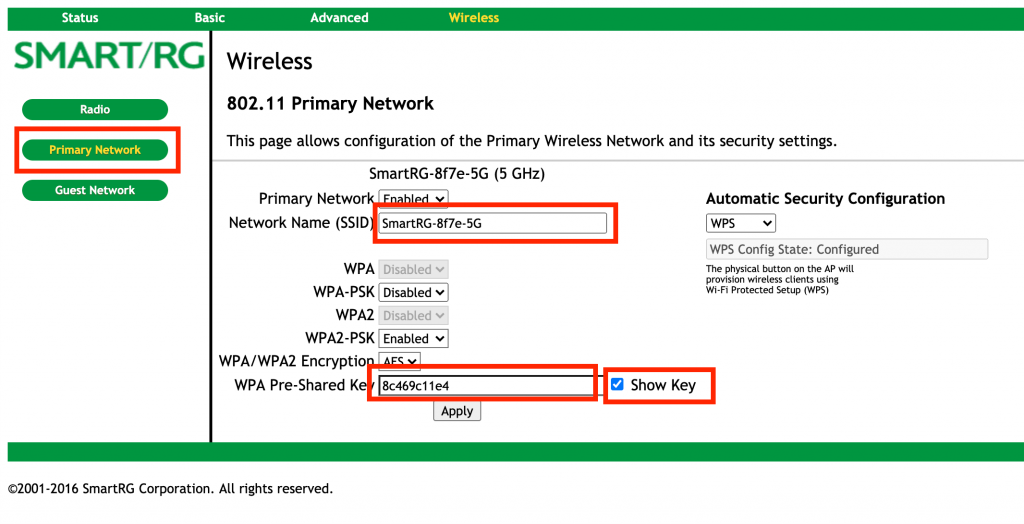
- When prompted for a username and password, type in user for both the username and the password
- Click Primary Network from the left menu
- From here, you can change the network name, network key, or even view the current key. See screenshot below for exact field names
- Visit http://192.168.0.1/ to arrive at the login screen
- By default, enter cusadmin for the username and password for the password
- On the left, click Wireless
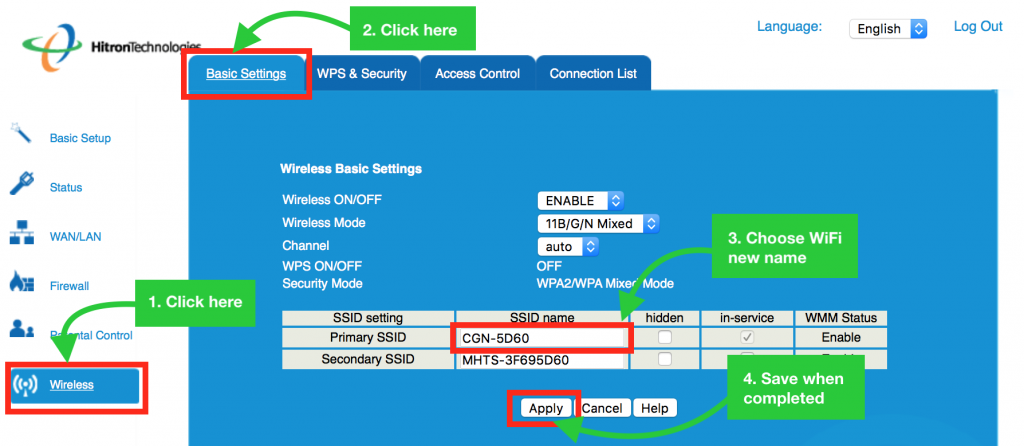
- On the top, click Basic Settings
- The SSID can be changed by editing the text field to the right of Primary SSID (currently set to CGN-5D60 in the example below)
- Once complete, click Apply to save your changes. Note: changing the SSID name may cause your device(s) to disconnect, since the old name would no longer exist anymore
- Open a browser and visit http://192.168.1.1/
- When prompted, enter cusadmin for the user and password for the password
- From the top menu, click Wireless
- From the submenu, click Basic Settings
- Click 5 GHz or 2.4 GHz depending which network you are using
- Click Basics
- Change the Network Name (SSID) and/or the Pass phrase.
- When completed, click Save Changes at the bottom
- Click Apply/Save at the bottom
- Open a browser and visit 192.168.0.1
- For the username, enter cusadmin and for password enter password.
- om the top menu, choose Wireless
- From the sub-menu, choose Wireless 2.4 Ghz (or Wireless 5 Ghz depending on what interface you are modifying).
- To change the WiFi password, edit the Pre-Shared Key field. To edit the WiFi channel, change the Channel field.
- Open a browser and visit http://192.168.0.1/
- From the Status menu (the only menu available) choose DOCSIS WAN
- Leave the Username and Password empty and click Log In.
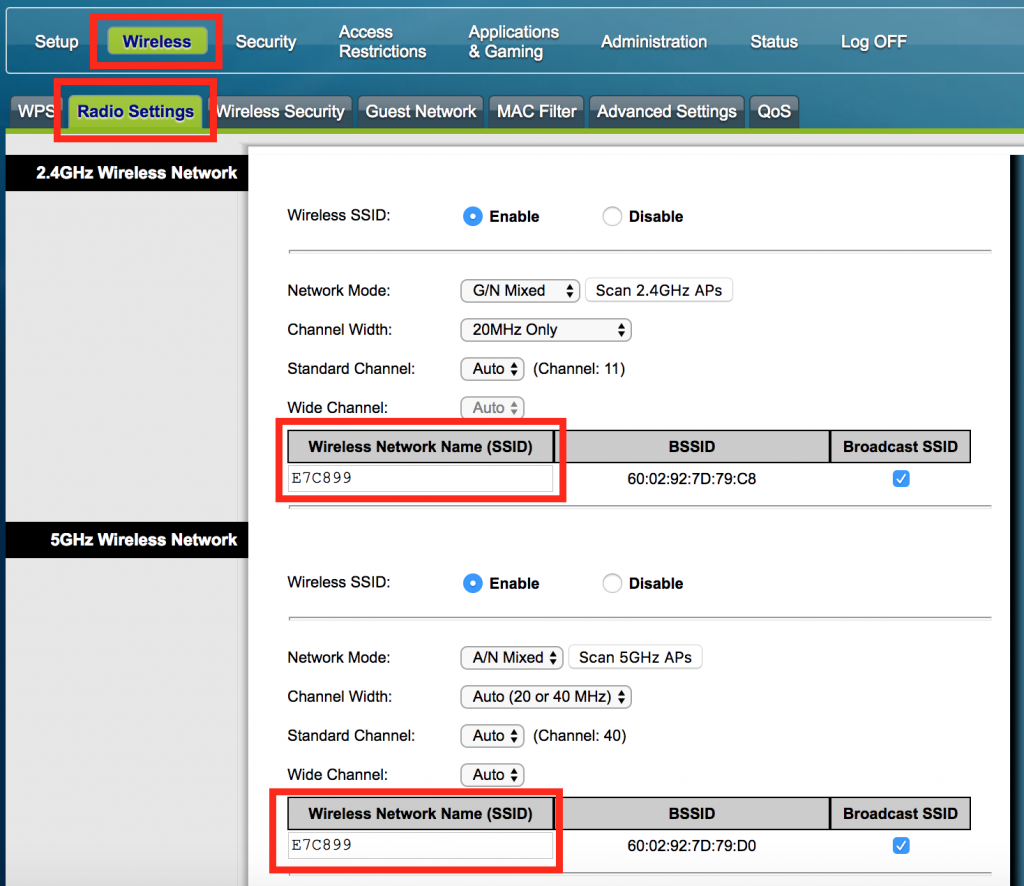
- From the Wireless menu, click Radio Settings
- In this section, you can edit the Wireless Network Name (SSID) and click Save Settings when completed (Note: there are two sections: one for 5 GHz and one for 2.4 GHz. Please ensure that you edit the section that pertains to the network you are connecting to)
- Open a browser and visit http://192.168.1.1/
- When prompted, enter admin for the user and kh3mfMAK for the password
- Click Wireless
- Click 5 GHz or 2.4 GHz depending which network you are using
- Click Basics
- Change the SSID field to your desired network name
- Click Apply/Save at the bottom
- Open a browser and visit 192.168.0.1
- When prompted for a username and password, type in user for both the username and the password
- Click Primary Network from the left menu
- From here, you can change the network name, network key, or even view the current key. See screenshot below for exact field names
- Visit http://192.168.0.1/ to arrive at the login screen
- By default, enter cusadmin for the username and password for the password
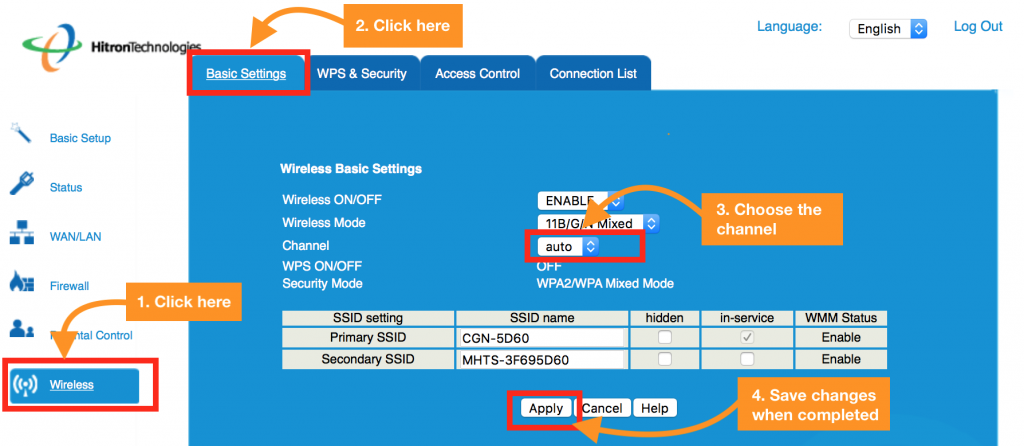
- On the left, click Wireless
- On the top, click Basic Settings
- The channel can be changed by selecting a new channel from Channel dropdown (currently set to auto in the example below)
- Once complete, click Apply to save your changes.
- Open a browser and visit http://192.168.0.1/
- From the Status menu (the only menu available) choose DOCSIS WAN
- Leave the Username and Password empty and click Log In.
- From the Wireless menu, click Radio Settings
- In this section, you can edit the Standard Channel and click Save Settings when completed (Note: there are two sections: one for 5 GHz and one for 2.4 GHz. Please ensure that you edit the section that pertains to the network you are connecting to)
- Open a browser and visit http://192.168.1.1/
- When prompted, enter admin for the user and kh3mfMAK for the password
- On the left menu, click Wireless
- Underneath Wireless, choose the appropriate band you are connected to (either 5 GHz Band or 2.4 GHz Band)
- Choose Advanced
- Change the channel accordingly, and click Apply/Save toward the bottom when completed
- Open a browser and visit 192.168.0.1
- When prompted for a username and password, type in user for both the username and the password
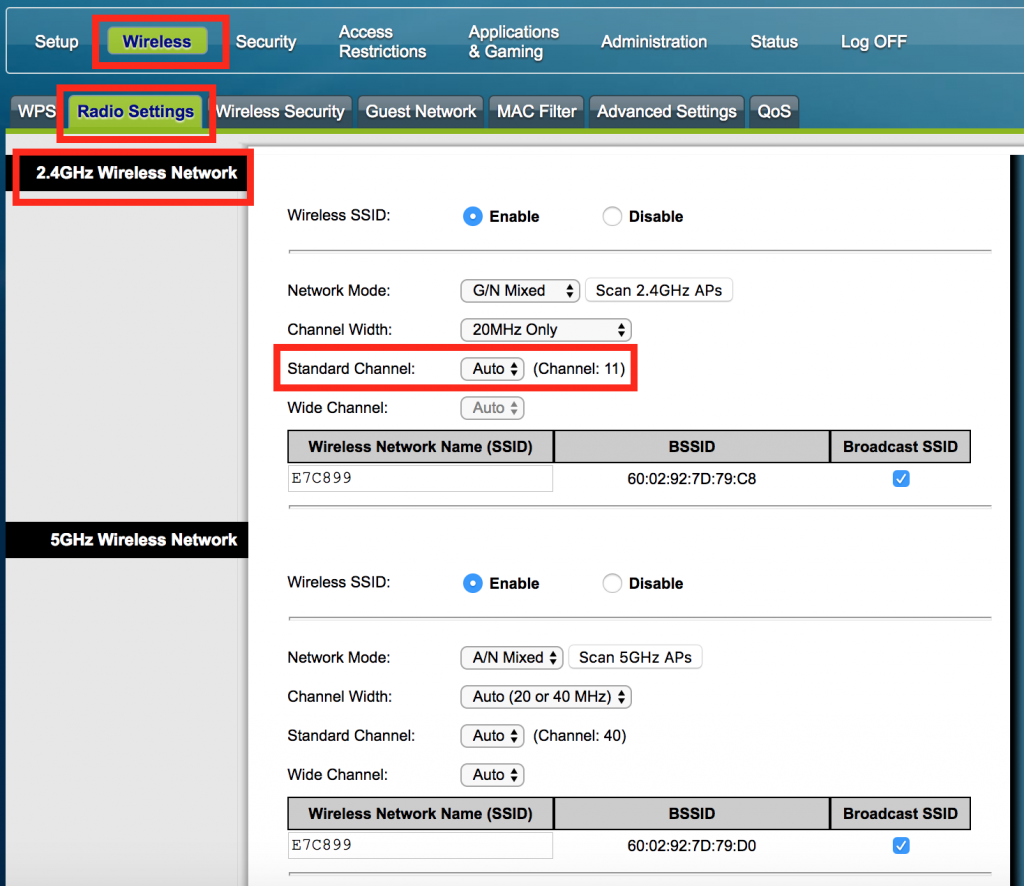
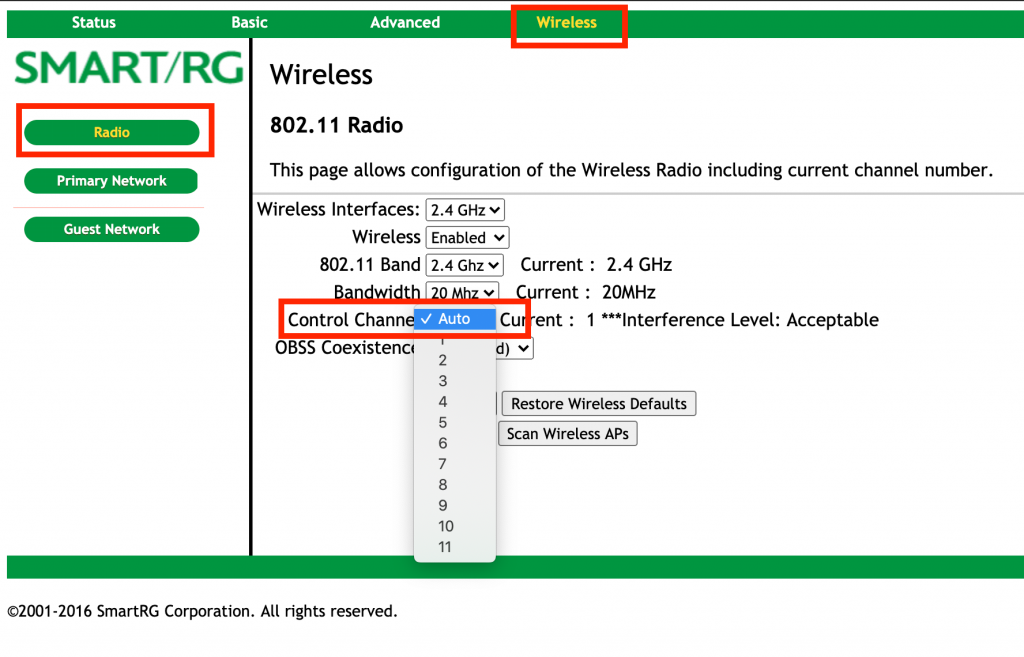
- Click Radio from the left menu
- From the Control Channel dropdown, choose the new channel and click Apply
- Visit 192.168.0.1
- For username enter admin and for password enter password. If that doesn’t work, use cusadmin for the username and password for the password
- From the top menu, choose Wireless
- From the sub-menu, choose Wireless 2.4 Ghz (or Wireless 5 Ghz depending on what interface you are modifying).
- Change the Channel drop down to your new desired channel
- Click Apply to save changes